Materials Laboratory Case Study #6 | Manufacturing – Supply Chain Upsets News

Manufacturing Supply Chain Upsets

MATERIALS LABORATORY CASE STUDY 6

THE PROBLEM
A supplier of electromagnetic interference (EMI) components noticed that one of their manufacturer’s components was not performing as well as similar components had previously.  The supplier had several theories on the make-up of the component and asked SI to investigate and confirm the material constituents as well as their distribution across the thickness.

THE SOLUTION
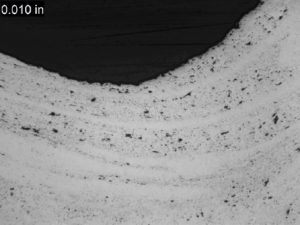
A small, coiled metallic sample, representative of the latest batch of material received from the manufacturer, was brought to SI’s Materials Laboratory for analysis. The goal of the analysis was to identify the elemental constituents present to help assess composition and also the distribution of the elements through the thickness. The sample was cross-sectioned and examined and documented in a scanning electron microscope (SEM) as shown in Figure 1. Using backscattered electrons (which help distinguish compositional differences) it was clear that the surfaces had a unique composition (dark grey) when compared to the base substrate (light grey). 

An elemental map of the cross-section was captured using energy dispersive X-ray spectroscopy (EDS) to identify the elements present across the thickness. The elemental map is provided in Figure 2 and the EDS analysis results are provided in Table 1. The sample was confirmed to comprise mostly of titanium and aluminum, which was expected, but was found to be titanium substrate with cladding of aluminum and silver on the surfaces .

Utilizing this information the supplier was able to engage with the manufacturer to help ensure that the material was being manufactured in a way suitable for the given end-use.

Figure 1. As received image of the metallic component and overall micrograph of the component cross-section red arrows show the cross-section location | Manufacturing – Supply Chain Upsets

Figure 1. As received image of the metallic component and overall micrograph of the component cross-section red arrows show the cross-section location
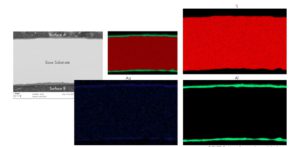
Figure 2. Maps showing elemental distribution through the component cross section | Manufacturing – Supply Chain Upsets

Figure 2. Maps showing elemental distribution through the component cross section

Element Surface A Base Substrate Surface B
Carbon 10.2 7.2
Oxygen 1.2 1.6
Sodium 0.7 0.7
Magnesium 0.8 1.1
Aluminum 76.5 0.5 81.8
Silicon 0.3 0.5 0.4
Calcium 0.2 0.3
Titanium 8.4 98.7 4.9
Iron 0.1 0.1 0.5
Silver 1.8 1.5

Elemental mapping is based on compiling extremely specific elemental composition data across an area of a sample. This is typically done in an SEM using EDS analysis. A high resolution image of the area of interest is collected along with the EDS data, and the two are correlated.

[1] The sample was prepared in a carbon-based mounting medium for use in the SEM, so much of the carbon is from sample preparation.

Download a Copy Here

News & Views

Materials Laboratory Case Study #5 | Process Upsets – Condition Analysis

Process Upsets – Condition Analysis

MATERIALS LABORATORY CASE STUDY 5

THE PROBLEM
A filter was removed from a stator cooling system after pressure differential sensors indicated it may be blocked. The filter was submitted to SI’s Materials Laboratory for analysis to help identify the material blocking it.

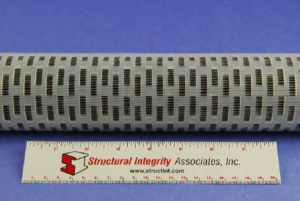
Figure 1. The filter shown in the as-received condition| Process Upsets – Condition Analysis
Figure 1. The filter shown in the as-received condition

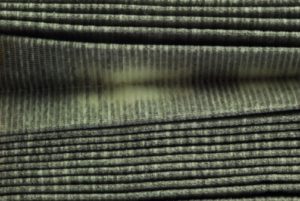
Figure 2. The yellow color is the original appearance of the filter | Process Upsets – Condition Analysis
Figure 2. The yellow color is the original appearance of the filter

THE SOLUTION
The filter was visually examined and documented in the as-received condition as shown in Figure 1. The submitted sample had a perforated plastic shell that covered an inner filter. The outer plastic was removed to provide access to the filter underneath. Figure 2 shows close images of the filter, which was yellowish-white with much of its surface covered in gray colored debris/deposit.

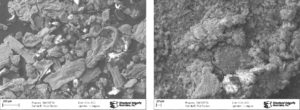
Figure 3. SEM images of material removed directly from the filter (left) and particles from the evaporated MEK (right) B | Process Upsets – Condition Analysis

Figure 3. SEM images of material removed directly from the filter (left) and particles from the evaporated MEK (right) B

A portion of the filter was scraped to remove the deposits. Another portion of the filter was removed and soaked in Methyl Ethyl Ketone (MEK) to remove the debris present on the filter. The solvent evaporated and the remaining particles were collected. Both samples were analyzed in a scanning electron microscope using energy dispersive X-ray Spectroscopy (EDS) to identify the elements present. The results are provided in Table 1. The results indicate that the filter debris was primarily copper oxide. Plant personnel reported that copper contamination could be occurring in the system, so these findings appeared to be consistent with plant information. With their suspicions confirmed, plant personnel were able to move forward with mitigation steps for keeping the filters from becoming blocked.

Element Material Removed from Filer Particles from MEK Wash
Carbon 4.9 ND
Oxygen 13.4 18.5
Aluminum 0.2 1.3
Silicon 0.4 4.2
Sulfur 0.1 0.3
Chlorine 0.1 0.1
Chromium 0.3 1.6
Iron 0.4 4.0
Nickel ND 0.4
Copper 79.7 68.4
Tin 0.4 1.3

Table 1. Filter Material EDS Analysis Results (wt.%)

Download a Copy Here


RELATED MATERIALS

Case Studies


News & Views

Materials Laboratory Solutions Case Study 4|Infrastructure Upgrades – Materials Analysis

Infrastructure Upgrades – Materials Analysis

MATERIALS LABORATORY CASE STUDY 4

THE PROBLEM
Structural Integrity received a section of an original star member from one of Austin’s Moonlight Towers (Figure 1). The material was suspected to be a ductile or malleable cast iron and the company refurbishing the towers needed to determine a suitable replacement material. SI was asked to perform materials testing on the sample to determine its chemical composition, measure its tensile strength, and evaluate the microstructure to determine the material type.

Figure 1. The star member shown in the as-received condition A | Infrastructure Upgrades – Materials Analysis

Figure 1. The star member shown in the as-received condition A

THE SOLUTION
A portion of the star member was submitted for tensile testing and quantitative chemical analysis. Based on the compositional analysis, and particularly the carbon content, the star member is a low carbon steel and not a cast iron. The composition is consistent with UNS G10050 or ASTM A29 Grade 1005. The material was found to have a tensile strength of about 50 ksi and a yield strength of about 30 ksi.

A cross-sectional sample from the star member was prepared for evaluation using standard laboratory techniques. The prepared sample was examined using a metallurgical microscope for evaluation of the microstructure, which is shown in Figure 2. The microstructure consisted of perlite, nonmetallic inclusions, and casting voids/flaws in a ferrite matrix. The microstructure is consistent with a low carbon steel and is not indicative of a ductile or malleable cast iron. The microstructure also showed significant deformation, presumably from forming the star shape (Figure 3). It is not clear if the casting voids/flaws present in the material indicate the material was originally cast and then formed, or if they are just indicative of the quality of the material at the time of manufacture (i.e., the component is not a casting).

With the information from this analysis, the company performing the refurbishment was able to select a suitable material to replace the old, original Moonlight Tower star members.

Figure 2. The typical star member microstructure A | Infrastructure Upgrades – Materials Analysis

Figure 2. The typical star member microstructure A

Figure 3. Deformation in the microstructure 2 | Infrastructure Upgrades – Materials Analysis

Figure 3. Deformation in the microstructure

MOONLIGHT TOWERS
The moonlight towers in Austin, Texas, are the only known surviving moonlight towers in the world. They are 165 feet (50 m) tall and have a 15-foot (4.6 m) foundation. A single tower originally cast light from six carbon arc lamps, illuminating a 1,500-foot-radius (460 m) circle brightly enough to read a watch. In 1894, the City of Austin purchased 31 used towers from Detroit. They were manufactured in Indiana by Fort Wayne Electric Company and assembled onsite. When first erected, the towers were connected to electric generators at the Austin Dam, completed in 1893 on the site of present-day Tom Miller Dam. In the 1920s their original carbon-arc lamps, which were exceedingly bright but time-consuming to maintain, were replaced by incandescent lamps, which gave way in turn to mercury vapor lamps in the 1930s. The mercury vapor lamps were controlled by a switch at each tower’s base. During World War II, a central switch was installed, allowing citywide blackouts in case of air raids. (source: Wikipedia)

Download a Copy Here


RELATED MATERIALS

Case Studies


News & Views

Materials Laboratory Case Study #3 | Manufacturer Infrastructure Upgrades – Material Verification News

Infrastructure Upgrades – Material Verification

MATERIALS LABORATORY CASE STUDY 3

THE PROBLEM
Structural Integrity received several sections of core reinforcing steel from a client performing work at a local university gymnasium (Figure 1). SI’s client needs to have an understanding of the material tensile strength in order to obtain the appropriate replacement material.

THE SOLUTION
Cross-sections were removed from each of the five samples and prepared for hardness testing. The hardness testing was performed as follows:

  • Shimadzu Microhardness Tester (HMV-2) –1.961 N load
  • Unit calibrated with a 206 Vickers (HV) sample block
  • Five readings were made on each sample

The five hardness readings from each sample were averaged and used to estimate the approximate UTS, and the material verification results are provided below.

Figure 1. The core reinforcing steel samples in the as-received condition | Infrastructure Upgrades – Material Verification

Figure 1. The core reinforcing steel samples in the as-received condition

Sample ID

Average Hardness (HV)

Approximate UTS (ksi)

C1-1

144.2

69

C1-2

147.6

70

C2-1

192.2

89

C2-2

198.6

92

C2-3

169.6

79

HARDENESS VS. TENSILE STRENGTH
Hardness is a measure of the resistance to localized plastic deformation induced by either mechanical indentation or abrasion, while ultimate tensile strength is the maximum stress that a material can withstand while being stretched or pulled before breaking. Because hardness can often be measured much more readily than tensile strength, it is convenient to use hardness to estimate tensile strength. Hardness correlates linearly to ultimate tensile strength through the empirical (although theoretically explained) equation H=UTS/k. Tensile strength estimates based on hardness should be used for guidance only and should not be used as set reference values. Some material conditions, especially cold work, can change the relationship between the tensile strength and hardness profoundly.

Download a Copy Here


RELATED MATERIALS

Case Studies


News & Views

Materials Laboratory Case Study #2 | Manufacturing – Process Upsets News

Manufacturing Supply Chain Upsets

MATERIALS LABORATORY CASE STUDY 2

THE PROBLEM
A manufacturer noticed recent material provided by a supplier was not performing as well as what had been provided previously, and asked SI’s Materials Laboratory to investigate.

THE SOLUTION
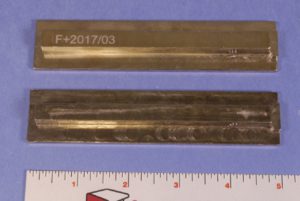
Two pieces of stock material were submitted for analysis (Figure 1). The sample marked as F was the most recent material supplied to a manufacturer and the unmarked sample was the material that had been previously supplied. The newer material was not performing as expected and SI was asked to compare the two samples to identify any differences.

Figure 1. The submitted samples of material

Figure 1. The submitted samples of material

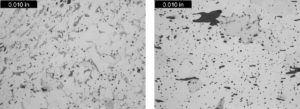
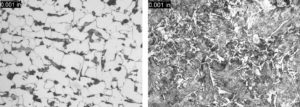
Cross sections were removed from both samples and prepared for metallographic examination. The microstructures from each are shown in Figure 2. The newer material (sample marked “F”) had a microstructure consisting of pearlite in a ferrite matrix. The previously manufacturer supplied material had a microstructure consisting of Widmanstätten ferrite and bainite. Hardness measurements were made on each prepared sample. The F sample had an average hardness of 66.7 Rockwell B and the unmarked sample had an average hardness of 90 Rockwell B. The measured hardness values were consistent with the observed microstructures.

The pearlitic microstructure and lower hardness value indicate that the newer material would have a lower tensile strength than the older material, which was likely the reason it was not performing as expected in its final application. Armed with this information the manufacturer has the information necessary to resolve the issue with the supplier.

Figure 2. The typical microstructures from the marked as F Left and the unmarked sample Right

Figure 2. The typical microstructures from the marked sample (left) and the unmarked sample (right)

TEST METHOD DETAIL
Metallographic examination involves mounting the cross-section, then grinding, polishing and etching. In this case, the carbon steel material was etched with a 2% Nital solution. The prepared sample was examined using an optical metallurgical microscope for examination at magnifications up to 1000X. The images shown were originally taken at 500X.

Download a Copy Here


RELATED MATERIALS
Case Studies


News & Views

Materials Laboratory Case Study #1 | Manufacturing – Process Upsets News

Manufacturing Process Upsets

MATERIALS LABORATORY CASE STUDY 1

THE PROBLEM
A small metallic particle that had contaminated a product line was brought to SI’s Materials Laboratory for analysis.  The goal of the analysis was to identify the particle’s composition to help identify its original source.

THE SOLUTION
The particle was examined and documented in a scanning electron microscope (SEM) as shown in Figure 1. The particle was several millimeters long and appeared to have been originally round in cross-section with subsequent mechanical deformation. The particle exhibited intermittent areas of a surface deposits that appeared black in the SEM images.

Figure 1. SEM images of the particle

Figure 1. SEM images of the particle

An area that was relatively free of the surface deposit was analyzed using energy dispersive X-ray spectroscopy (EDS) to identify the element present in the base material. The EDS analysis are provided in the table. The particle was attached to an aluminum planchet with a piece of carbon tape, so much of the carbon is from the sample preparation. The EDS results indicated the particle was essentially an iron-based metal with approximately 18% chromium and 8% nickel, which is consistent with Type 304 stainless steel. Knowing the composition, the manufacturer is investigating possible sources.

Element Weight %
Carbon 4.2
Oxygen 1.5
Aluminum 0.2
Silicon 0.9
Chlorine 0.1
Chromium 17.9
Manganese 3.8
Iron 63.5
Nickel 7.4
Molybdenum 0.4

TEST METHOD DETAIL
EDS provides qualitative elemental analysis of materials based on the characteristic energies of X-rays produced by the SEM electron beam striking the sample. Using a light element detector, EDS can identify elements with atomic number 5 (boron) and above. Elements with atomic number 13 (aluminum) and higher can be detected at concentrations as low as 0.2 weight percent; lighter elements are detectable at somewhat higher concentrations. As performed in this examination, EDS cannot detect the elements with atomic numbers less than 5 (beryllium, lithium, helium or hydrogen). The relative concentrations of the identified elements were determined using semiquantitative, standardless quantification (SQ) software. The results of this analysis are semi-quantitative and indicate relative amounts of the elemental constituents.

Download a Copy Here

RELATED MATERIALS
Case Studies